Earth & Environmental Science Projects

Posts in the earth science projects category

Question: Can You Create a Weather Science Experiment?

The study of weather affect every one of us each and every day. Convection, high and low pressure frameworks, dissipation; these things help decide whether our event will be rained out, or if we will have a sunny day to enjoy the outdoors. Learn more about the way weather works by doing these hands-on experimental projects.

Project 1: Convection Current

Did you know, as air warms up, its particles extend and spread out, making the air thinner than it was before it was heated up. It glides up through the denser cool air above it. As the warm air rises it begins to chill and its atoms draw nearer together, making it sink once more. This flow is called convection, and the rising and falling of the air are called streams. Convection streams are a part of what causes various types of weather. You'll discover how this works in the following experiment.

Note: You should have a grown-up help you with the hot water and the sharp knife.
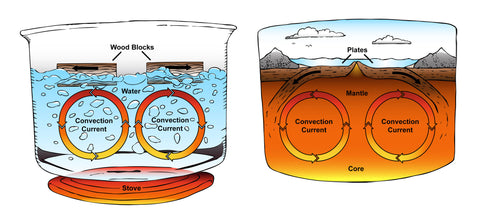
Convection currents

Materials Needed:

Water

Elastic (rubber) band

Plastic wrap

Knife

Food coloring

Small glass or receptacle (it needs to fit inside the Large glass or receptacle)

Large glass or receptacle

Procedure:

  1. Carefully fill the small glass or receptacle with hot (bubbling) water and include a few drops of food coloring. Extend the plastic wrap gently over the glass and seal it with the elastic band. The plastic wrap will puff up; this is because the hot air over the water is growing.
  2. Fill the large glass full with cool water from the tap.
  3. Use a pair of tongs to set the glass of hot water in the base of the jug.
  4. Cut open the plastic wrap with the knife and watch what happens! One long slice ought to do it.


Project 2: Sea Breeze

Air appears like the lightest thing on the planet, yet it really pushes down on you and the ground with a lot of pressure. This pressure is called pneumatic force. Pneumatic force doesn't generally remain the same; meteorologists measure its progressions with a gauge. In the last experiment, we saw that when air warms up it starts to rise. When it rises, it doesn't push on the ground with as much weight. A territory loaded with light, warm air is known as a low pressure zone. The areas with cool, denser air are called high pressure zones.

Note: Have a grown-up help you with the oven and matches. 

sand

ice


Materials Needed:

Cardboard box

Candle

Sand

Two metal pans

Ice

Procedure:

  1. Set up the project in a place where it will be shielded from drafts. If necessary, you can make a three sided screen by cutting off one side of a cardboard box.
  2. Empty some sand into one of the pans and place it in the oven to warm it up. Set temperature to 300 degrees for about 5-8 minutes.
  3. While the sand is warming up, light a candle and after that blow it out. In which direction does the smoke flow? If you have shielded your experiment area from drafts, it should flow straight up like your convection current.
  4. Fill the second pan to the brim with ice. Put the pan of hot sand and the pan of ice next to each other. Now set the hot pan on the pot holder.
  5. Light the candle again and blow it out, then hold it in the middle of the two pans, ideally over the edge of the ice pan. In which direction does the smoke flow?


Project 3: Evaporation Station

The low pressure zones make mist on the ground as the rising hot air conveys dampness with it. The dampness is as a gas called water vapor. At the point when the water vapor cools, it forms water beads that consolidate to shape mist. How does the water vapor get into the air in the first place? A large portion of it originates from dissipation. Dissipation happens when water particles warm up; they increase enough vitality to transform from a fluid into a gas, and afterward they ascend into the air to be carried on rising convection streams. You have witnessed this in your kitchen when steam ascends from hot bubbling water.

Are there variables that can change how quick water vanishes? You can discover it by setting up an experiment to test the impact of wind, temperature and surface zone on the rate of vanishing. The accompanying strategy will give you the essentials, yet don't hesitate to think of your own techniques for testing and measuring the outcomes.

Materials Needed:

Lamp

Pie pan or a shallow dish

Two kitchen sponges (sponges should be similar size)

Small glass

Electric fan

Procedure:

1. Test the impact of temperature utilizing a lamp to give warmth. Put two kitchen sponges on the plates and pour about 1/8 cup of water over each of them. depending upon the size of the sponge, you may need to use more water. Use enough to get the sponge wet completely through. Place one of the sponges directly under the lamp and the other at room temperature out of direct daylight. Watch the sponges at exact intervals of time, and lessen the time between viewings as they get closer to drying. Record how much time it took each of the sponges to dry completely.
2. Test the impact of wind by using an electric fan. Dampen the sponges as you did in step 1. Set one sponge about 12 inches from the electric fan and turn the fan on. Set the other sponge some place out of the draft. Watch the sponges at exact intervals of time. Record how much time it took each of the sponges to dry completely. Which one dried quicker? Did the sponge in the fan dry quicker than the one under the lamp in step 1?
3. Now test the impact of more or less surface region. Pour about 1/8 cup of water into a small glass. Locate the surface zone of the water in the cup using the equation π r 2 (π = 3.14, r = radius. Discover this by measuring the diameter of the cup and dividing this by two). Pour about 1/8 cup of water into a pie pan or wide shallow dish. Measure the surface area of the water in this container. Set the cup and the pan on the counter and check them a couple times each day. Which water dissipates quicker? The water with the tiny surface area or the expansive surface area?

Posted by Paula Chen on 04 April, 2017 earth science projects, high school, middle school | Read more →

Question: What Direction Should Solar Panels Face?

Imagine you're in the process of installing solar panels to create a sustainable energy source for your home, school, business, etc. You would want to make sure you place the panels facing in the ideal direction so that they could collect as much solar energy as possible. How could you find out what direction will get you the optimal result? Do the experiment below and you can find out!

Materials Needed:

(Any of The Materials Highlighted in Blue are Clickable Links for Purchasing)

Magnetic compass

Empty tissue box

Marker

Pen and paper

4 outdoor/indoor thermometers

Sunny day

Sand (or other form of weight)

Tape

Plastic wrap


Procedure:


  1. Fill your empty tissue box with sand.
  2. Tape each of the four thermometers to the tissue box, one to each side, with all the bottoms facing the same direction.
  3. Tape a layer of plastic wrap over each thermometer using a square of equal size for each of them.


Solar Diagram


  1. Find a spot outside that you know will get sunlight all day.
  2. Try to wake up before the sun rises so that you can place your tissue box in this spot. Use your compass to find north, and rotate one side of your tissue box to face that direction. Label this side with an ‘N,’ and make sure to all the other sides with their corresponding directions on the compass.
  3. After the sun begins to rise, wait half an hour and look at the temperature for each thermometer. Record the time for each thermometer in a chart like this:
  4. Do this after every hour over the course of the day, until late in the afternoon (or until sunset, if you can wait that long!).
  5. Collect your tissue box and make a graph of temperatures using the data you collected. What’s the difference between the highest and lowest temperature thermometers? Is this surprising to you? Are the temperatures the same at dawn and sunset?

Results:

What data you get will depend on your latitude and what time of year it is, but if you’re in the United States you should see a higher overall temperature on the thermometer that faced south than the thermometer that faced north. Someone in the southern hemisphere would see a higher temperature on the thermometer facing north.

Posted by Isaac Fornari on 07 March, 2017 earth science projects, elementary, middle school | Read more →

Question: Can You Grow Slime Mold?

Summary: In this experiment we will explore the world of Amoebas (Single cell organism with no definitive shape) by growing slime mold, a substance made of millions of Amoebas grouped together. 

Materials Needed:

(Any of The Materials Highlighted in Blue are Clickable Links for Purchasing)

Petri dish

2 pie-sized dishes with clear lids

Paper towel

Distilled water

1-ft length of rubber tubing

Scissors

Rubber or Nitrile gloves

Slime mold samples (These can be collected in a moist wooded area)

Uncooked rolled oats

Colored pencil

Eye dropper

Different cereals and/or fruit (for slime mold food)

Vinegar and/or nail polish remover (to add as a toxin)

Project Procedure:

  1. Wear rubber or nitrile gloves to prevent contamination of your set up.
  2. Cut three one-inch lengths of rubber tubing, and then cut down the length of the tubing so they are open circles.
  3. Fit the tubing pieces around bottom of the pie dish as shown in the diagram.
  4. Place the petri dish inside the pie dish.
  5. Cut out a circle of paper towel larger than the petri dish and lay it on top of the petri dish.
  6. Wet the paper towel thoroughly with distilled water.
  7. Place the clear lid of the pie dish over the set up.


Slime Mold Growth Setup


Grow the mold!:

  1. Place a sample of the slime mold on the paper towel with a drop of water.
  2. Once the slime mold is rehydrated and moving around, place an uncooked oat in contact with it.
  3. Keep the dish covered wheneveryou are not feeding the mold.
  4. Once the mold starts to grow larger, place more uncooked oats in its path and watch it grow!
  5. Keep the paper towel moist (you can use a spray bottle filled with distilled waterto mist the paper towel).
  6. Throughout the experiment, take pictures of the mold or make sketches to document the life of the mold. Use the colored pencils to note any color or size changes. Record your observations.

Experiment!:

  1. On different trials, try using different cereals or fruit to feed the molds. What helps the mold grow best? What foods do the molds prefer?
  2. On other trials, try added small drops of toxins, like vinegar or nail polish remover. What happens? Why?
Posted by Isaac Fornari on 11 September, 2015 earth science projects, elementary, middle school | Read more →

Stay in touch

Contact Us

We'd love to hear from you. Call 800-282-3248 toll-free or 408-727-7301. Email us here. Or come by our retail store at:
The Science Shop USA
1043 Di Giulio Ave
Santa Clara, CA 95050-2805
Open Mon-Fri 9 a.m. - 5 p.m. (Pacific Time)

Latest Additions to Our Science Project Database

  • Question: What Are the Best Liquid Conductors of Energy?

    Summary: This experiment explores the kinds of liquids that are the best conductors of energy when splitting the molecules of water through electrolysis. Materials Needed: (Any of The Materials Highlighted in Blue are Clickable Links for Purchasing) 9 v Battery... Read more →

  • Question: Can You Make a Battery Out of a Potato?

    Summary: In this experiment, a potato is used to create an electrochemical battery, in which chemical energy is converted to electrical energy through spontaneous electron transfer. The energy created is enough to power a digital clock. Materials Needed: (Any of... Read more →